
Contents
In the previous part, we discussed the mechanisms of tooth and bone loss with age and how tilted implants help restore a full arch of teeth in bone-deficient situations. We also briefly touched on the advantages and disadvantages of full-arch restoration protocols on 4 or 6 implants. In this section, we’ll continue our analysis using real clinical cases, highlighting potential shortcomings and mistakes to help clinicians avoid them in the future.
A New Prosthesis in One Day – What Does This Require?
Let’s return to the illustration from the first part, which demonstrated one of the main advantages of full-arch protocols on 4/6 implants. We’ll examine this particular case, along with all the errors made and the ways to correct them.
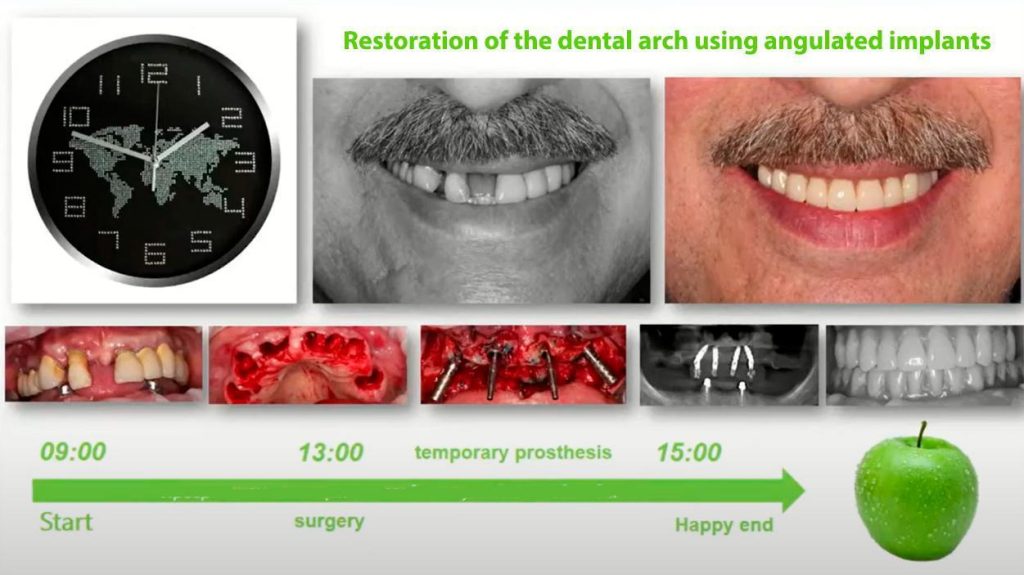
One-step tooth extraction, implantation, and prosthetics—the patient goes home with a new smile and a functional jaw. YouTube / Dr. Kamil Khabiev / Dental Guru Academy
Let’s start with the primary implant stability required to allow immediate loading. The table below shows the insertion torque values that dictate whether immediate, early, or delayed loading is appropriate, or if implant repositioning is necessary.
| Insertion Torque | Tactics | Prognosis |
| 0-10 Ncm | Attempt to place a wider-diameter implant to achieve adequate torque. If unsuccessful, place a cover screw for primary closure (delayed protocol only). | Poor – if the implant is not re-inserted. |
| 10-30 Ncm | Place a cover screw and achieve primary closure. | Satisfactory, but only with a delayed protocol |
| 30-40 Ncm | Placement of a healing cap. | Good – early loading may be possible if the ISQ is > 70. |
| 40-50 Ncm | Placement of a temporary or permanent abutment is indicated; immediate provisionalization is possible. | Excellent without restrictions. |
| More than 60 Ncm | The implant should be backed out, the osteotomy may be widened, and the implant is re-inserted with a torque not exceeding 50 Ncm. | Poor – if the implant is not re-inserted. |
Of course, insertion torque is not an absolute indicator of primary stability. Resonance Frequency Analysis (RFA) data is much more reliable. This is measured as the ISQ (Implant Stability Quotient), which ranges from 0 to 100. If the ISQ is less than 60, only a delayed protocol is acceptable. For immediate loading, the ISQ must be at least 70.
Contraindications to Immediate Loading
- Insufficient primary stability: insertion torque less than 40 Ncm or an ISQ less than 60.
- The presence of any parafunctional activity: bruxism, clenching, involuntary jaw movements, etc.
What Should a Patient Do After Immediate Loading Implantation?
- For the first few weeks, a soft-food diet is required.
- Avoid heavy chewing forces for the first 6 weeks.
- If the prosthesis becomes loose or fractures, consult your doctor immediately.
- Before the sutures are removed, regularly rinse your mouth with an antiseptic solution.
- After suture removal, maintain regular oral hygiene using special brushes and an oral irrigator. It is important to inform the patient that hygiene for implant-supported prostheses is more complex and time-consuming than for natural teeth.
So, here’s our patient. Many teeth have been lost, and the remaining ones were deemed hopeless. We won’t go into detail about the diagnosis, but all preliminary procedures were completed, CBCT images were taken, digital impressions were obtained, and by the day of the surgery, a tissue- and palate-supported temporary denture was fabricated. This will be converted into a screw-retained provisional prosthesis, attached to the multi-unit abutments.
Initial condition of teeth and surrounding bone at the time of treatment. YouTube / Dr. Kamil Khabiev / Dental Guru Academy
In principle, it would have been possible to save the two maxillary canines, but there was little strategic value in doing so. The treatment plan called for the extraction of all upper teeth and the placement of implants. The patient had a telescopic denture in the lower jaw, supported by cobalt-chromium copings on the canine roots. The patient had been using this denture for several years, and it remained unchanged for the time being.
The teeth were extracted atraumatically to preserve as much soft tissue as possible and avoid damaging the buccal plates of the extraction sockets, especially in the anterior region.
Condition of soft tissues after tooth extraction. YouTube / Dr. Kamil Khabiev / Dental Guru Academy
The doctor then disinfected the surgical site using photodynamic therapy. This treatment kills microflora through the action of active oxygen while leaving healthy bone tissue unharmed.
We proceeded to the surgical stage. First, a flap was raised, and then 4 implants were placed.
Placement of 4 implants taking into account the patient’s anatomy. YouTube / Dr. Kamil Khabiev / Dental Guru Academy
The central implants were placed with a slight palatal inclination and were restored with 17° angled multi-unit abutments. The distal implants were restored with 30° angled multi-unit abutments (MUAs). All abutments were selected with a 2 mm gingival height.
Next, we will analyze why the temporary prosthesis was made in this particular configuration. The palatal portion of the denture serves as an indexing key. The palate is the only stable anatomical landmark in the upper jaw after tooth extraction. Therefore, the impression captures this palatal anatomy. To ensure the occlusion of the upper and lower dentures matches, the prosthesis is first seated firmly against the palate to establish the correct position, and then it is adapted to the temporary cylinders on the abutments.
Temporary upper jaw denture. YouTube / Dr. Kamil Khabiev / Dental Guru Academy
In this clinical case, the temporary upper prosthesis was not reinforced. The rationale for this decision was that the patient would continue to use the removable lower denture for some time. Therefore, the risk of prosthesis fracture due to bruxism could be mitigated by the patient simply removing the lower denture at night. However, clinical experience suggests this is a mistake, and any long-term provisional prostheses should be reinforced. In this particular case, the denture held up well for 2.5 months. Afterward, the patient received a permanent prosthesis spanning from first molar to first molar. However, a reinforced prosthesis is always more reliable, and the easiest way to achieve this is with prefabricated reinforcement bars, such as Easy Bars.
The process of retrofitting the prosthesis by luting the temporary cylinders into the body of the prosthesis requires special attention and care.
The process of installing a temporary denture: fitting and securing sleeves for screw retention. YouTube / Dr. Kamil Khabiev / Dental Guru Academy
First, the prosthesis is secured to the sleeves with a small amount of light-curing composite. It is important to maintain the correct relationship between the prosthesis and the sleeves.
Primary fixation of a temporary prosthesis to multi-unit abutment sleeves. YouTube / Dr. Kamil Khabiev / Dental Guru Academy
The cavities are then filled with cold-cure, autopolymerizing acrylic resin. The prosthesis is then trimmed and finished.
Marking and fitting a temporary denture. YouTube / Dr. Kamil Khabiev / Dental Guru Academy
Next, the prosthesis is polished and delivered to the patient.
The final finished and fitted upper jaw prosthesis was successfully installed. YouTube / Dr. Kamil Khabiev / Dental Guru Academy
By the end of the third month after implant placement, the patient received a permanent prosthesis extending to the first molars.
Methods of Reinforcing Temporary Full-Arch Prostheses
As we mentioned in the previous case, full-arch provisional prostheses delivered at the time of implant placement must be reinforced. This can be accomplished in several ways:
- Easy Bar prefabricated reinforcement bars. Sold in kits with multiple links ranging from 6 to 30 mm in length, they allow for easy selection for any implant configuration. The total time to fabricate a reinforced prosthesis is no more than 6 hours. These links can also be used intraorally to splint impression copings during the impression-taking process. Reinforcement link kits are available in stainless steel and titanium.
Links for reinforcing temporary dentures. YouTube / Dr. Kamil Khabiev / Dental Guru Academy
2. Intraoral Welding. This is a method proposed by Dr. Marco Degidi (Bologna, Italy). It is very reliable and accounts for all individual anatomical variations, but it is technically demanding and requires extensive training.
Dr. Marco Degidi’s method of reinforcing temporary dentures using intraoral welding. YouTube / Dr. Kamil Khabiev / Dental Guru Academy
The primary challenge of this technique is achieving a truly passive fit between the wire and the temporary cylinders that connect to the multi-unit abutments. Visually, everything may look fine, but even a microscopic gap of 0.05 mm can prevent a passive fit, inducing stress in the framework and implants. Moreover, the compression from the welder’s electrodes can mask this misfit by forcing the components together, which locks in the stress.
This issue can be mitigated by fabricating a precise guide on the laboratory model. The photo above shows that the wire is welded not only to the cylinders for the temporary prosthesis but also to small pins that extend into the body of the denture. This helps ensure a perfect passive fit. Once in the mouth, the reinforcing wire is welded to the cylinders. The entire structure is then handed over to dental technicians for final acrylic processing and polishing.
Fabrication of Long-Term Temporary Prostheses Using CAD/CAM (PMMA)
These prostheses are typically delivered 48 to 72 hours after implantation. They offer excellent aesthetics and are quite reliable. High precision is ensured by their fabrication on a CNC milling machine. The prosthesis is first designed digitally using a virtual model of the patient’s jaws with the implants in place, and then it is sent for fabrication. This minimizes the number of adjustments required during delivery.
PMMA temporary denture. YouTube / Dr. Kamil Khabiev / Dental Guru Academy
PMMA prostheses have a high degree of durability, which can sometimes become a problem. Patients may leave and not return to replace their temporary prosthesis with a permanent one. Sometimes, they return after 6-12 months, complaining that the prosthesis has broken. Therefore, it is advisable to have the patient sign a consent form acknowledging that they have received a temporary prosthesis and that the treatment is not yet complete. To its credit, PMMA is a fairly robust and durable material that can last up to two years.
Therefore, despite being a temporary restoration, the same functional and aesthetic requirements apply to it as to a permanent one. Prostheses must be perfectly polished, especially in areas of contact with the mucosa.
A well-prepared and polished long-term temporary denture. YouTube / Dr. Kamil Khabiev / Dental Guru Academy
This means no overhanging ledges or rough surfaces, as food impaction can easily lead to inflammation. Therefore, all surfaces should be easy to rinse and clean without the risk of food debris getting trapped.
Conditions for Successful Restoration with Immediate Implantation and Immediate Loading
- Insertion torque during implant placement of at least 45 Ncm.
- Splinting the implants with Easy Bars, intraoral welding, or a bar. The temporary prosthesis should not have any cantilevers. If it is only possible to create a prosthesis with no cantilevers by extending to the second premolars (from 5 to 5), then that is the correct approach. The final prosthesis may incorporate a short cantilever to extend the arch to the first molars (from 6 to 6).
- No premature occlusal contacts. It is best if full-arch restorations are not performed on both arches simultaneously. In the case discussed above, the conditions were almost ideal—the lower jaw had a removable denture, minimizing the risk of the patient generating traumatic clenching forces.
- Freedom from occlusal interferences in all excursive movements.
- Minimal overbite and overjet in the anterior region.
- Satisfactory aesthetics. There’s no need to strive for perfection with the provisional; PMMA is, after all, plastic. Within 3-4 months, the material will begin to stain as it absorbs pigments from tea, coffee, and other products, which will inevitably affect its appearance.
Novice surgeons should not attempt complex full-arch cases without proper training. Those who want to master the technique of total implant-supported rehabilitation should undergo specialized training, and fortunately, there are plenty of courses taught by experienced colleagues. Particular attention should be paid to the condition of the mucous membrane. It often makes sense to perform soft tissue grafting simultaneously with implantation.
Thank you for your attention. Stay tuned for the next publication.
Frequently Asked Questions (FAQ)
Clinical guidance on immediate loading protocols, full-arch restoration, and prosthesis management.
What insertion torque and stability values are required for immediate loading of dental implants?
Immediate loading requires a minimum insertion torque of 40-50 Ncm, with optimal values between 40-60 Ncm. Resonance Frequency Analysis (RFA) provides more reliable stability assessment, with an ISQ (Implant Stability Quotient) of at least 70 required for immediate loading. If torque is below 40 Ncm or ISQ is less than 60, only delayed loading protocols should be considered.
What are the main contraindications to immediate loading?
The two primary contraindications are insufficient primary stability (insertion torque less than 40 Ncm or ISQ less than 60) and the presence of parafunctional activities such as bruxism, clenching, or involuntary jaw movements. These factors significantly increase the risk of implant failure and should prompt consideration of delayed loading protocols instead.
What reinforcement methods are recommended for temporary full-arch prostheses?
Three main reinforcement methods are available: prefabricated reinforcement bars (Easy Bars) in stainless steel or titanium, intraoral welding as described by Dr. Marco Degidi, and CAD/CAM-milled PMMA prostheses. Easy Bars offer simplicity with 6-30mm links that can be selected based on implant configuration. Intraoral welding is technically demanding but accounts for individual anatomy, while PMMA prostheses provide excellent aesthetics and durability.
What post-operative instructions should patients follow after immediate loading?
Patients must maintain a soft-food diet for the first few weeks and avoid heavy chewing forces for at least 6 weeks. They should rinse regularly with antiseptic solutions until suture removal, then maintain meticulous oral hygiene using special brushes and oral irrigators. Any prosthesis loosening or fracture requires immediate consultation, as these complications can jeopardize osseointegration.
How long can PMMA temporary prostheses typically last, and what are the associated risks?
PMMA temporary prostheses can last up to two years, though they typically begin staining after 3-4 months from tea, coffee, and food pigments. Their durability can become problematic when patients delay returning for permanent restoration, sometimes appearing 6-12 months later with fractured prostheses. Clinicians should have patients sign consent forms acknowledging the temporary nature of these restorations.
What angulation of multi-unit abutments is considered safe for full-arch restorations?
The article demonstrates use of 17° angled multi-unit abutments for central implants and 30° for distal implants in full-arch protocols. While angulations up to 30° are commonly used in All-on-4 protocols, careful treatment planning and proper load distribution across multiple implants are essential. Higher angulations increase stress at the implant-abutment interface and require meticulous prosthetic design to minimize horizontal forces.
What are the critical success factors for immediate implantation with immediate loading?
Success requires insertion torque of at least 45 Ncm, proper splinting of implants using reinforcement methods, and elimination of cantilevers in temporary prostheses. Additionally, clinicians must ensure freedom from premature contacts and occlusal interferences, maintain minimal overbite and overjet in the anterior region, and achieve satisfactory aesthetics. Simultaneous soft tissue grafting should be considered when mucosal conditions warrant it.
Why is cement-retained fixation not used for full-arch protocols on 4/6 implants?
Cement-retained abutments are not digitized and incompatible with CAD/CAM technologies, making it nearly impossible to fabricate a full-arch prosthesis that fits correctly on the first try. Multiple try-ins and adjustments create discomfort for patients and increase treatment costs. Screw-retained multi-unit abutments allow for predictable digital workflows, precise fit, and easy retrievability for maintenance or adjustments.
Should clinicians use analog or digital impressions for full-arch implant cases in digital dentistry?
Analog silicone impressions remain more accurate for complex full-arch cases, so a hybrid workflow is recommended. The process involves taking a physical impression, pouring a master cast, then digitizing the physical model with a high-resolution laser scanner. The prosthesis fabricated from the virtual model can be verified on the physical cast, reducing the need for patient appointments while maintaining accuracy.
Disclaimer: Any medical or scientific information provided in connection with the content presented here makes no claim to completeness and the topicality, accuracy and balance of such information provided is not guaranteed. The information provided by XGATE Dental Group GmbH does not constitute medical advice or recommendation and is in no way a substitute for professional advice from a physician, dentist or other healthcare professional and must not be used as a basis for diagnosis or for selecting, starting, changing or stopping medical treatment.
Physicians, dentists and other healthcare professionals are solely responsible for the individual medical assessment of each case and for their medical decisions, selection and application of diagnostic methods, medical protocols, treatments and products.
XGATE Dental Group GmbH does not accept any liability for any inconvenience or damage resulting from the use of the content and information presented here. Products or treatments shown may not be available in all countries and different information may apply in different countries. For country-specific information please refer to our customer service or a distributor or partner of XGATE Dental Group GmbH in your region.