
Contents
How to find the optimal balance between simplicity, reliability, minimal risks, and speed in obtaining a prosthesis?
The doctor’s preferences in choosing a treatment approach should align with the patient’s needs. Otherwise, the patient will likely disagree. Therefore, building a trusting relationship with the patient and providing complete information about the risks and benefits of each treatment method is crucial.
We have compiled a table outlining modern approaches to implant-supported dental restoration. The risk level for each method is color-coded from green (safe) to orange (risky). A risky method doesn’t necessarily mean problems will arise, but it implies more restrictions, contraindications, or a higher level of skill required from the clinician.
| Treatment method | Brief description | Notes |
|---|---|---|
| Two-stage implantation (delayed protocol) | The implant is placed and covered with a healing screw, followed by suturing. A healing cap is placed at a second stage. | Because of the need for two surgical procedures instead of one, this method is less safe. Indications for two-stage protocols are constantly decreasing. |
| One-stage implantation (delayed protocol) | Simultaneously with implant placement, GBR (Guided Bone Regeneration), gum plastic surgery (if necessary), and a healing cap are placed. | Surgical interventions are no longer required when installing the restoration. |
| Immediate implantation (direct) | Implants are placed immediately after tooth extraction or surgical interventions into bone tissue. | If teeth have been missing for a long time, immediate implantation is often accompanied by: Sinus lift; Ridge split |
| Early loading | Prostheses are placed 1-1.5 months after implant placement, rather than after 3 months. | Implants can be placed using either a one-stage or two-stage approach. |
| Immediate non-functional loading | A temporary prosthesis is placed immediately after implant placement but kept out of occlusion. | Removing the bite/occlusal forces reduces the load and lowers the risk of complications. |
| Immediate functional loading (total work and R2Gate) | A temporary, and sometimes permanent, prosthesis is immediately placed into occlusion. | This option is available under particularly favorable conditions: good bone quality and quantity, healthy gums, and access to modern diagnostic and prosthetic equipment for designing and fabricating dentures and abutments. |
Despite the risks, immediate implantation with placement of prostheses (temporary or permanent) shortens rehabilitation time and often meets or exceeds patient expectations.
Another factor influencing the ability to immediately place dentures is the primary stability of the implants. Here’s a quote from Thomas Albrektsson: “The resistance of the implant to displacement forces is the key to the success of osseointegration.” Current interpretations of the osseointegrated response: Clinical significance. Int J Prosthodont 1993:6:95-105
Implant displacement under the influence of external forces YouTube / Dr. Kamil Khabiev / Dental Guru Academy
Below is a table that indicates the primary torque during implant installation and a possible scenario for further actions.
| Primary stability, Ncm | Tactics | Prognosis |
|---|---|---|
| 0-10 | Placement of a larger diameter implant, placement of a healing screw and suturing of soft tissues; if it is impossible to replace the implant, then a healing screw and suturing in the hope that everything will be ok with secondary stability. | Poor if the implant is not replaced, but sometimes the implant integrates. If this is not a single restoration and the load is distributed evenly, it can function normally. |
| 10-30 | Placement of dentures or even healing caps is unacceptable; healing screw placement and tight suturing of the gums. | Good, but early loading is not indicated. |
| 30-40 | Placement of a healing cap and suturing of soft tissues. | Great. |
| 40-50 | Placement of a temporary (or permanent) abutment with a temporary or permanent prosthesis is possible, but placement of a healing cap, or even a healing screw and suturing, is also possible if there are other indications. | Excellent (this is ideal). |
| More than 60 | The implant is removed, the osteotomy is expanded, and the implant is reinserted with a torque of no more than 50 Ncm. With ultra-high torques, the bone is severely injured and there is a risk of compression resorption. | Poor if the implant is not reinserted. High torque can cause bone injury and resorption. |
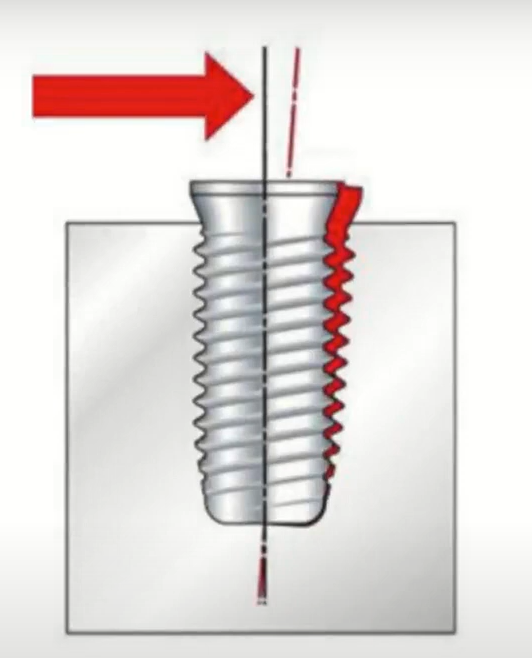
Let’s examine what happens when primary stability is insufficient, and we load the implant. This causes micromobility of the implant.
In this scenario, bone tissue cells that come into contact with the implant surface die. Osseointegration slows down, or fibrous integration can occur where connective tissue grows around the implant instead of bone cells integrating with the titanium surface.

Cell destruction during implant mobility due to insufficient primary stability YouTube / Dr. Kamil Khabiev / Dental Guru Academy
If the contact between the implant and the bone tissue is poor, resulting in large gaps, difficulties with osseointegration also arise.
Too large a gap between the bone tissue and the implant surface also complicates osseointegration YouTube / Dr. Kamil Khabiev / Dental Guru Academy
What is a one-stage implantation protocol?
Implants are placed in a delayed manner. That is, after the tooth was removed, enough time has passed for the bone and soft tissue to heal completely. The procedure to place the implant is standard, and if we achieve an insertion torque of 30-40 Ncm, a healing cap is immediately placed on the implant, and the soft tissue is sutured around it. Let’s consider a specific clinical case as an example.
One-stage implantation protocol: simultaneously with the implant, the healing cap is placed, and the prosthodontist works with the already formed gingival cuff YouTube / Dr. Kamil Khabiev / Dental Guru Academy
This approach eliminates the second surgical stage, reducing pain, swelling, and prolonged healing for the patient. Every surgical intervention carries a risk of inflammation, and even if a course of antibiotics is prescribed, it’s only for one to three days.
After 2-2.5 months, prosthesis placement is possible. However, in our clinical case, the gingival cuff formed poorly, and the wide crown stretches the gum too much. The image shows blanched gums, and the crown is not fully seated. In this case, we have screw retention, and upon discovering this issue, we remove the crown with the abutment and address the soft tissues.
Unsuccessfully formed gingival cuff (left); the prosthesis could not be seated completely, the crown is higher than the adjacent teeth YouTube / Dr. Kamil Khabiev / Dental Guru Academy
In this situation, you need to work with the gums. However, complex gum surgery with connective tissue grafting is not necessary. Longitudinal incisions from tooth to tooth to release the soft tissue are sufficient. Then, use a rasp to thin the soft tissue buccally.
A longitudinal incision of the gingival cuff will allow the screw-retained crown to be installed in the planned position, and the soft tissue will heal and form a new soft tissue attachment YouTube / Dr. Kamil Khabiev / Dental Guru Academy
After manipulating the soft tissues, we re-install the screw-retained crown. The prosthesis now fits into place. The gums are still blanched, but the crown is seated correctly.
The crown is in place; blanching of the gums is observed immediately after installation, but this is a temporary phenomenon YouTube / Dr. Kamil Khabiev / Dental Guru Academy
A follow-up photograph three months after prosthesis placement confirms the correction. The gums appear healthy, the gingival papillae are well-formed, and there is no visible ridge collapse adjacent to the prosthesis. The patient experiences no discomfort. The gums are tight, and food does not become trapped under the gums.
Healthy gum around the crown restoration is fully functional and looks good YouTube / Dr. Kamil Khabiev / Dental Guru Academy
This simple solution is possible only with screw-retained prostheses. The finished crown is placed into the soft tissue, which is able to move apart and straighten the gums. Cement-retained prostheses would not allow this. In the case of cement retention, gum plastic surgery with a graft would be required, which is not guaranteed to be successful. Excessive soft tissue growth is common and may require further surgical intervention.
Conditions for success, limitations, and features of the implantation technique with immediate loading
First, let’s look at the risk factors for immediate implantation that can cause early and late complications of prosthetics:
- Gingival margin recession. Often, the gums are supported by the root of the tooth to be extracted rather than bone, particularly in the anterior region.

- Lack of keratinized (attached) gingiva on the buccal aspect. Soft tissue plastic surgery is needed.
- Thin mucosal biotype with high gingival zeniths and thin keratinized gingiva (1-2 mm).
- Thin or damaged buccal bone wall (4-6 mm).
- Inability to achieve adequate primary stability.
- Proximity to important anatomical structures, such as the maxillary sinus, mandibular nerve, or the curved root of an adjacent tooth.
- Inability to place the implant in the optimal prosthetic position. This is often related to the above factors. The implant will be overloaded, and the prosthesis will be difficult to fabricate.
Each of these factors requires detailed analysis and individual solutions. However, the most critical are issues with the buccal wall, such as bone resorption or mechanical damage, leading to the situation shown below.
If you lack sufficient knowledge of IDR (Immediate Dentoalveolar Restoration) techniques, it is best to proceed with delayed implantation. Perform GBR (Guided Bone Regeneration) to restore adequate alveolar ridge volume before placing the implant using a conventional approach.
A difficult case for immediate implantation – in such cases it is recommended to first restore the volume of bone and soft tissue and then return to the idea of placing an implant YouTube / Dr. Kamil Khabiev / Dental Guru Academy
Experienced implantologists can manage situations like the one above by anchoring the implant in the palatal aspect and filling the space under the soft tissues with osteoplastic material. In this case, a large volume of connective tissue graft or PRF (Platelet-Rich Fibrin) membrane is placed under the gum. PRF promotes healing and can increase gum volume, sometimes working better than a connective tissue graft. Therefore, mastering the IDR procedure and expanding your capabilities is recommended.
Now, let’s briefly address the term “anchoring.” Unlike the healed alveolar ridge, a fresh extraction socket is challenging for implant placement. The socket is empty, so you need to secure the implant to ensure adequate primary stability. This fixation under difficult conditions is called anchoring. There are two types:
- Apical Anchoring: The tip of the implant extends beyond the root apex of the extracted tooth. The radiograph below shows an example of an implant anchored into the floor of the maxillary sinus, with the cortical layer of the sinus providing primary stability.
Apical anchoring of the implant – the tip of the implant passes through the cortex of the maxillary sinus YouTube / Dr. Kamil Khabiev / Dental Guru Academy
Initial stability was sufficient for immediate placement of a healing cap. The implant body protruding into the maxillary sinus is not an issue. If the depth of intrusion is less than 5 mm, new bone forms around the implant apex, and the Schneiderian membrane heals completely.
- Interproximal Anchoring: The implant is wider than the socket of the extracted tooth. After premolar extraction, the socket often resembles the image below.
Hole after removal of a double-rooted tooth YouTube / Dr. Kamil Khabiev / Dental Guru Academy
In such cases, a larger diameter implant is recommended and placed in the interradicular septum (between the roots of adjacent teeth), such as 4.2-4.5 mm. Stability is primarily achieved through the middle and upper portion of the implant, rather than just the apex. This is called interproximal anchoring. It is particularly important when the implant length cannot exceed the length of the extracted tooth’s root, due to the proximity of the mandibular nerve or other anatomical structures.In the photo below, the implant is 4.0×10 mm and placed in the premolar position, with the upper portion providing primary stability. The implant is placed in the correct prosthetic position; its axis aligns with the fissure of the future crown.
Implant 4.0×10 mm with interproximal anchoring – primary stability is provided by the neck and upper third of the implant YouTube / Dr. Kamil Khabiev / Dental Guru Academy
What depth is recommended for implant placement immediately after tooth extraction?
One advantage of immediate implantation is preserving the height of the bone surrounding the implant. However, research by Dr. Araujo’s group in 2005-2006 established that:
“Immediate implantation does not necessarily prevent physiological bone remodeling after tooth extraction”
![]()
The illustrations below show the condition of the bone wall around the implant at the molar position 4 and 12 weeks after placement.
Results of assessing the condition of the bone peaks around the implant: 4 weeks (left); 12 weeks (right) YouTube / Dr. Kamil Khabiev / Dental Guru Academy
We can conclude that subcrestal placement (1.5-2 mm below the buccal bone crest) is recommended even for immediate implantation. Otherwise, the outcome may resemble the image below, where the implant head does not contact the bone. The doctor initially placed the implant level with the bone, but bone loss (blue line) occurred rapidly.
Results of bone resorption around the implant neck – therefore it is recommended to install implants subcrestally even with immediate implantation YouTube / Dr. Kamil Khabiev / Dental Guru Academy
Subcrestal implant placement compensates for bone loss.
How to position the implant relative to the lingual and buccal walls and adjacent teeth
The illustration below shows the recommended placement of the implant relative to the buccal wall (2 mm) and adjacent teeth. The implant center should align with the arch of the teeth. This ensures the implant is centered under the future crown. General implant placement principles:
- Deeper than bone level (subcrestal placement)
- Palatal/Lingual offset from the buccal wall
Recommended 3D implant positioning for immediate implantation YouTube / Dr. Kamil Khabiev / Dental Guru Academy
Safety of immediate implant placement
Many doctors are concerned about placing an implant in the presence of active inflammatory processes like apical periodontitis. However, numerous studies confirm that immediate implant placement is safe and yields good long-term results despite chronic periapical lesions. Below are links to two articles that examine these processes:
Immediate implantation can sometimes produce better outcomes than two-stage protocols because bone tissue experiencing recent trauma has peak regenerative capacity, making this a reliable method.
Socket Shield Technique for immediate implantation
This technique involves leaving a fragment of the tooth root (the “shield”) in the socket, which helps preserve the bundle bone and the overall thickness of the buccal wall. The periodontium on the buccal side of the root and its capillary network then nourish the bone tissue.
Implant placement using Socket Shield Technique YouTube / Dr. Kamil Khabiev / Dental Guru Academy
Standard protocols and specific instruments are available for the Socket Shield technique. It is highly recommended to follow the protocol strictly and use a certified set of instruments. Deviations are only appropriate after acquiring extensive experience with these procedures.
Tool kit for implant placement using Socket Shield Technique YouTube / Dr. Kamil Khabiev / Dental Guru Academy
Let’s analyze the technique using a specific clinical case. The patient sustained a traumatic luxation of tooth #12 (upper left lateral incisor) after being accidentally struck in the face by a child. Therapists attempted unsuccessfully to treat the tooth for 1.5 years, resulting in a significant bone defect on the palatal side (visible in the image on the right). The tooth is mobile and causes severe discomfort.
IInitial situation: luxation of the tooth root, bone defect on the palatal side, buccal side is intact, the bone wall fits tightly to the root of the tooth YouTube / Dr. Kamil Khabiev / Dental Guru Academy
This case is notable because the tooth root contacts the buccal wall well, allowing for implantation using the Socket Shield technique.
The problematic tooth was previously splinted to the adjacent tooth to reduce mobility, which did not produce the desired effect.
The problematic tooth (12) is splinted with the adjacent tooth (11) to reduce mobility YouTube / Dr. Kamil Khabiev / Dental Guru Academy
Noticeable suppuration (pus) was present on the palatal side, and pus drained from the bone cavity during anesthesia.
Discharge of pus from the palatal side of the problematic tooth (12) YouTube / Dr. Kamil Khabiev / Dental Guru Academy
We cannot rely on the palatal wall for support, but the intact buccal wall offers a good prospect for successful implantation. Extraction and healing would typically be the first consideration. However, this is the anterior zone, which will result in bone and soft tissue degradation. Moreover, this area is aesthetically significant, and this degradation will cause the patient significant discomfort.
Immediate implantation enables full preservation of soft tissue, and we know how difficult it can be to restore gums in the anterior zone.
Although we will not provide a detailed discussion of sterilization techniques in this document, please be aware that periostitis is not a contraindication for this procedure.
In the first step, we remove the coronal part of the affected tooth. On the buccal side, we see clean, healthy dentin. There is no infectious process within the tooth. Aseptic pulp necrosis occurred as a result of the trauma, but the dentin and cementum are light-colored.
The first stage of removal is to cut off the crown part of the problem tooth YouTube / Dr. Kamil Khabiev / Dental Guru Academy
Next, we measure the depth of the root canal to determine the appropriate division point for the root.
Measuring the depth of the root canal before removing part of the root YouTube / Dr. Kamil Khabiev / Dental Guru Academy
The surgeon then deviates slightly from the standard protocol, which suggests dividing the root into two halves, removing the palatal half, and working with the buccal fragment.
Recommendations of the standard implantation protocol using the Socket Shield technique: 1. Using the initial diamond bur, go deep into the root to a depth of about 7 mm and separate the palatal and buccal parts of the root, so that the palatal part of the root becomes slightly rounded. 2. Use a second small-diameter diamond bur to reach the end of the root. 3. Extract the palatal fragment of the root YouTube / Dr. Kamil Khabiev / Dental Guru Academy
However, in this case, the surgeon drilled out a larger volume of the inner root than instructed in the protocol in order to reduce the amount of tooth dust produced by the division. The doctor reserved division of the root and extraction of the palatal portion for the final stage before preparing the implant site.
A tooth root drilled from the inside, prepared for division and removal of the palatal part of the root YouTube/Dr. Kamil Khabiev / Dental Guru Academy
Next, the surgeon uses a final diamond (end) bur to grind the anterior wall to a depth of 3 mm, which roughly corresponds to the height of the gingival soft tissue attachment (biologic width). When viewed from the occlusal surface, the buccal remainder of the root (shield) should look like a crescent. The ideal shield thickness in the central portion is 1.5–2 mm.
Preparing the shield with a special diamond bur YouTube / Dr. Kamil Khabiev / Dental Guru Academy
As a result, we get this picture. The buccal wall has already been prepared, and all that remains is to remove the palatal wall.
Prepared buccal wall and ground palatal wall before the stage of its removal YouTube/Dr. Kamil Khabiev / Dental Guru Academy
Next, the root of the tooth is sectioned, and the palatal fragment is removed. As can be seen in the picture, this fragment is already quite thin and can be removed without effort.
Extracted palatal fragment of the root of an affected tooth YouTube / Dr. Kamil Khabiev / Dental Guru Academy
Finally, we are left with a processed buccal fragment of the tooth. In the image below, we see light, clean cementum containing dentin inclusions.
The buccal wall (shield), ready for further manipulation, color and condition of completely healthy tissue YouTube / Dr. Kamil Khabiev / Dental Guru Academy
From the inside, we perform cleaning via curettage and cavitation. Then, we place the implant according to the standard protocol, as if the root fragment were not present on the buccal wall, and follow the apical anchoring technique.
Placement of an implant using the Socket Shield method does not differ from the standard method of apical anchoring of the implant: on the left is an illustration from the standard protocol; in the center – a photo of a real clinical case; on the right is an x-ray of a successfully placed implant YouTube / Dr. Kamil Khabiev / Dental Guru Academy
After confirming implant primary stability and parallelism, we place the healing cap. Osteoplastic material is generally recommended for immediate implantation in the anterior region to prevent resorption of the buccal bone wall, followed by gingival recession and implant exposure. However, in this specific case, the doctor did not use osteoplastic material, because the buccal wall is supported by a fragment of the tooth root with preserved periodontium and partial periodontium, and not a bone graft.
The healing cap was installed immediately after implant placement; no osteoplastic material was used in this case YouTube / Dr. Kamil Khabiev / Dental Guru Academy
Given that this is the aesthetic zone, the patient cannot be left with a dentition defect. Consequently, the previously cut-off coronal portion of the extracted tooth was utilized as a temporary prosthesis and secured to the adjacent teeth and the healing cap using composite resin.
A temporary prosthesis is made from the coronal part of an extracted tooth YouTube / Dr. Kamil Khabiev / Dental Guru Academy
- Initial situation with tooth luxation and periodontal defect.
- Implant placed in the correct prosthetic position.
- Implant with healing cap.
A series of radiographs from the initial situation (left) to a successfully installed implant and a temporary prosthesis attached to it (right) YouTube / Dr. Kamil Khabiev / Dental Guru Academy
As for the remaining tooth root (shield), it remains with the patient permanently. It typically remodels and integrates into the buccal wall.
In the next part of this article, we will discuss devices for measuring primary stability, temporary abutments, the materials from which they are made, and technologies for fabricating temporary and permanent prostheses, from simple impression-based techniques to modern CAM/CAD technologies. See you in the next article.
Disclaimer: Any medical or scientific information provided in connection with the content presented here makes no claim to completeness and the topicality, accuracy and balance of such information provided is not guaranteed. The information provided by XGATE Dental Group GmbH does not constitute medical advice or recommendation and is in no way a substitute for professional advice from a physician, dentist or other healthcare professional and must not be used as a basis for diagnosis or for selecting, starting, changing or stopping medical treatment.
Physicians, dentists and other healthcare professionals are solely responsible for the individual medical assessment of each case and for their medical decisions, selection and application of diagnostic methods, medical protocols, treatments and products.
XGATE Dental Group GmbH does not accept any liability for any inconvenience or damage resulting from the use of the content and information presented here. Products or treatments shown may not be available in all countries and different information may apply in different countries. For country-specific information please refer to our customer service or a distributor or partner of XGATE Dental Group GmbH in your region.